Monday, March 2, 2009

Circle Takes the Square: A Seamless Raglan Beanie

Circle Takes the Square is a basic striped beanie with squares framed and created by its raglan decreases. You can easily switch up the look of the hat with your color choice. It can be collegiate, hip, goth, or mod—the power is yours!

In striped knitting in the round (like this hat), I recommend carrying the yarn along the inside of the work (both for the sake of reducing the finishing work to be done and for ‘yarn economy’) and working the jogless stripes technique at the color change. It’s super-easy and incredibly effective in hiding the “hiccup” that can occur when switching color. The doubled decreases are worked side-by-side and create a “seam” that really pops and brings structure to the hat.

The full pattern is published here, but it's also available for download as a free PDF at the bottom of this post!

Sizes :
S (M, L) to fit a head approx 20” (22”, 24”) in circumference. The Medium is probably what would work for most adults.

Gauge:
18 sts and 24 rows/4” in st st on larger needles. For the ribbing, use a needle 2 sizes smaller than the one you use to get this gauge in st st. This will create a more uniform knit-stitch size between the ribbing and the stockinette stitch

Materials:
• Worsted weight yarn in 2 colors, approx 80g of each. I used Cascade 220 in Jet (MC) and Ruby (CC) for the Black & Red version. I used Cascade 220 in Jet (MC) and Louet Riverstone in Caribbean Blue (CC) for the Black & Blue version. (You can use any worsted weight yarn that will get you the gauge noted above.)
• US 7 circular needle and/or DPNs and US 5 circular needle and/or DPNs OR the size you need to get gauge!
• Tapestry needle for weaving in ends.

Make It!
With smaller needles, CO 88 (96, 104) sts in MC and PM. Join to work in the round.
Rows 1-7: K1, [p2, k2] to last st. K last st.
Row 8: Switch to larger needle, K all sts
Row 9-15: twisting yarns at join, switch to CC and k all sts. Don’t forget to work jogless stripes on the first stich of the 2nd row in CC (7 rows total in CC).
Row 16: Switch to MC and knit as rows 9-15. Switch colors every 7 rows until hat measures
approx 3” (3.5”, 4”) from CO edge*. On last round, [K 22 (24, 26) sts and PM], repeat for all sts
on this round. Next round: begin decrease rows.

*Be the Boss! As written, the hat should just barely cover the top of the wearer’s ears. This is how I like to wear my beanies, but if you’d like your beanie to cover the wearer’s ears, then add about 1.5” of length. Continue striping until hat measures 4.5” (5”, 5.5”) from CO edge.


Decrease rows:
[Ssk, k 18 (20, 22) sts, k2tog], repeat around. 80 (88, 96) sts remaining.
Next round: k all sts.
So you’ll be working the decreases in this manner: k2tog on the right side of the stitch marker, and SSK on the left side of the stitch marker, then knitting all stitches on one row in between decrease rows (line-by-line directions below). Remember to change colors every 7 rows. It becomes really fiddly to work the jogless stripe for color changes once you start decreasing, but give it a go if you feel adventurous! Continue this way until you end up w/16 sts after decreasing, then work finishing.

Decrease line-by-line:
After working first decrease round and k all sts on the next round (as indicated above):
[Ssk, k 16 (18, 20) sts, k2tog], repeat around 72 (80, 88) sts, Next round: k all sts.
[Ssk, k 14 (16, 18) sts, k2tog], repeat around 64 (72, 80) sts, Next round: k all sts.
[Ssk, k 12 (14, 16) sts, k2tog], repeat around 56 (64, 72) sts, Next round: k all sts.
[Ssk, k 10 (12, 14) sts, k2tog], repeat around 48 (56, 64) sts, Next round: k all sts.
[Ssk, k 8 (10, 12) sts, k2tog], repeat around 40 (48, 56) sts, Next round: k all sts.
[Ssk, k 6 (8, 10) sts, k2tog], repeat around 32 (40, 48) sts, Next round: k all sts.
[Ssk, k 4 (6, 8) sts, k2tog], repeat around 24 (32, 40) sts, Next round: k all sts.
[Ssk, k 2 (4, 6) sts, k2tog], repeat around 16 (24, 32) sts, For the Small size, break yarn and finish according to directions below, for other sizes: Next round: k all sts.
[Ssk, k -- (2, 4) sts, k2tog], repeat around -- (16, 24) sts, For the Med. size, break yarn and finish according to directions below, for Large size: Next round: k all sts.
[Ssk, k -- (--, 2) sts, k2tog], repeat around -- (--, 16) sts, finish as noted below.


Finishing:
break yarn, leaving a tail approx. 10” long. With a tapestry needle, thread this yarn through all remaining sts and pull closed. Weave in ends, place on head, rock the block w/your fancy new hat!
__________________________________________________
I originally made this hat as a gauge swatch for a yet-to-be-made sweater. Actually, the sweater is about 3/4 finished, but the body is way too big and the neck is way too small (I made it top-down). I now have a copy of Knitting From the Top and I plan to use it as a guide when I re-knit it, rather than an online pattern generator that will go unnamed (for shame!!!). The original hat (the Black & Red one at the top) is already more than a year old, and I wear it almost every. single. day. I kind of love Cascade 220 right now! It's affordable, comes in A LOT of colors, wears well, and it doesn't feel too bad, either!

There's a band out there that goes by the name "Circle Takes the Square". I was aware of them when I named the hat, and the name fit, so it stuck. At the time I decided on the name I hadn't ever heard any of their music. Now I have. Suffice to say it's not for me. ;o)

This pattern PDF is available as a FREE download! Click the button below to download. You do not need to be a Ravelry member in order to download the PDF from this page.


Happy knitting!

EDIT: Visit TricotChico.blogspot.com for more knitting patterns by Homero Luna.

Monday, February 16, 2009

30 Rounds of Ribbing


It is no secret that i am a devotee of one Mrs. Elizabeth Zimmerman. (Shock! Awe! You didn't know this was coming!) I'm only short a couple of her books (Hint Hint: Opinionated Knitter and Knitting Around). The most recent one to come into my collection is the timeless classic, Knitting Workshop. 

Now, a couple months ago had you asked me "Davitron, What EZ book should I buy first?", my answer would have been, hands down, Knitting Without Tears. But that has changed! Knitting without tears is a FANTASTIC book, but it assumes you know a little more about knitting than you might actually know. Where as Knitting Workshop talks to you like you just finished your first garter-stitch scarf and are eager for more, without making you feel dumb. It speaks very plainly about techniques and reasons-why. For this matter, I'm going to have to say it is now my all-time favorite book. (Notice i didn't clarify with "EZ book" or "Knitting Book". Yeah. I went there.)

One of the things that left me the MOST skeptical about this book was Elizabeth's (we're on a first name basis these days) staunch insistance on 30 rounds of 2x2 ribbing at the bottom of each sweater, and at the bottom of each cuff. 30. 30. I'll say it again. 30. That feel liks an INSANE amount of ribbing. That is knit knit purl purl ad nauseum, et al, por vida, FOREVER

That being said, I am almost done with a sleeve on a new design (It is delicious, i tell you what) and i decided to GO FOR IT, and see how this 30-rounds-of-ribbing turns out.


How did it turn out you ask? Why... amazing. Of Course. Liz Doesn't lie (we also have nicknames for one another, of course). But I do have a couple notes on the issue. 


1) EZ does not suggest going down a needle size or two. And honestly, it's not necessary REALLY.. but it looks nice. You're already doing 30 rounds of 2x2 ribbing for the sake of a beautiful sweater, why not try it down a couple needle sizes? What could it hurt, really? It's worth it. It pulls in JUST  enough more and looks gorgeous. This way, when your ribbing inevitably settles to be a little less snug and a little more sheer with the rest of your garment, the fact that it's knit at a tighter gauge still allows it to fit closely. 

2) this is an OK place to decide to knit it flat, if you're going to steek (I will gush about steeking at another point).Cast on a multiple of 4 + 2-stitches. Knit one, Purl1, then K2P2 until the last two stitches, P1, k1. Knit each stitch as it appears on your needle back and forth and back and forth and back and forth for 30 rows, then either do a cable cast-on, knitted cast-on or backwards loop cast-on for the remaining stitches (1,3 or 5, depending on your feelings about steek selvages, i do 5-stitch selvages, so i would cast-on 3 stitches), then join to work in the round. bam! You carry the purl stitch after the first knit stitch, and before the last knit stitch on the selvages allllll the way up. It adds a nice bit of structure. But, that's just my opinion - I'm sure EZ could tell you a half dozen other ways to do it!

Wednesday, February 11, 2009

So Much for my Anti-Garter Bias

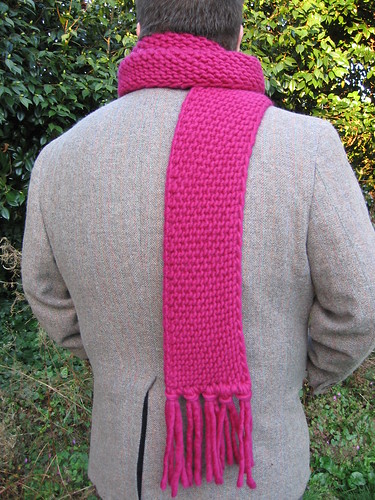
A different angle on a traditional garter-stitch scarf, I knit this both as a means to rectify a gap in my Knitter's Education and to create something eye-catching and fun-to-knit with this big, bold yarn. I'd never really made the de rigeur beginner's garter-stitch scarf and wanted to play with that stitch patter, but I also didn't want to make a plain, rectangular scarf with horizontal garter stitch, so I thought I'd try knitting on the bias. Not long after that, a pile of Brown Sheep Burley Spun caught my eye and insisted that I play with it. It comes in some really bold colors, and I LIT'rally couldn't stop thinking about it until I realised it was perfect for the garter stitch-on-the-bias scarf I so wanted to make. At the same time, Davitron (seen below modeling the scarf) needed a scarf, but hates knitting them, so really it was a win-win situation. ;o)


Knit in super-bulky yarn in a vibrant color, the big stitches and diagonal garter ridges are eye-catching and mask the super-easy backwards-loop cast-on used to increase. The slipped-stitch edge on the 'increase' side serves both to hide the increase stitch and mirrors the knit two together decrease used on the decrease side.

The full pattern text is published here, but the pattern is also available for download as a free PDF at the bottom of this post.

Size:
The model shown measures approximately 6"x7'10", post-blocking.

Gauge:
Not super-important for scarves, but here it is: 8 sts & 12 rows = 4" in st st.

Materials:
- Brown Sheep Burley Spun, 2 skeins in fuchsia, OR approximately 260 yards of super-bulky yarn of your choosing in your favorite color.
- US 13 needles, or the size you need to obtain gauge.

Make it!
The construction of this scarf can, essentially, be broken down into three major parts: increasing, adding length, and decreasing.


Increasing:
-CO 3 sts
-Sl 1 knitwise, co1 using backwards-loop cast-on, k1, co1, k1
-next row: k4, p1
[next row: sl1, co1, k all sts to last st, co1, k1
-next row: k all sts to last st, p last st] repeat until you have 20 sts on your needle.

Adding Length:
Once you have 20 sts:
[1: sl1, m1, k all sts to last 2 sts, k2tog
2: p1, k all sts to last st, p last st]
-one edge of the scarf (the "m1" edge) will be longer than the other. Repeat these two rows until the "long side" measures the desired length, then...

Decreasing and Binding-Off:
Once you have reached the desired length for your scarf:
[3: k2tog, k all sts to last 2 sts, k2tog
4: p1, k all sts], repeat these two rows until you have 2 sts left.
-Slip the first stitch (the one closest to your hand on the "working needle") over the 2nd stitch. Cut a tail approximately 10" long, pull this through the last stitch and weave in ends.

Finishing:
Block and apply tassels as desired.

The pattern PDF is also available as a FREE download! Click the button below to download the PDF (you do not need to be a Ravelry member to download from this page).

Happy knitting!

EDIT: Visit TricotChico.blogspot.com for more knitting patterns by Homero Luna.

Tuesday, February 3, 2009

In Which TricotChico Knits a Noro Striped Scarf

This blog has been a long time coming, and I'm really excited to finally be able to post it! The knitting has been finished for quite some time, but since this project is all about color, I wanted to be sure that I was able to get photos that effectively conveyed what it is that I got so excited about. Many thanks to Lee for offering to shoot this scarf for me when my basic digicam wasn't equal to the task at hand. Thankfully, we were both at Sarah's "stuporbowl" party (it was more about the beer and commercials than the game!) and took the opportunity to get some yarnography in. I'm really fortunate to have such awesome people in my life! [BTW-Sarah makes some AWESOME vegetarian chili! If you ever receive an invite to share it, I say you clear your schedule and get there early!]

The subject matter is a project that it seems like everyone and their mom has knit (the Noro Striped Scarf), but my resistance to Noro's self-striping colorways precluded me from engaging in this sort of thing for quite a while. Many of the more vibrant colorways (of Kureyon, especially) tend to come across to me as clown barf; too many bright colors all at the same time! However, though many of the color combinations were unappealing to me, some of the colors individually are/were quite lovely and they chanted my name oh-so-seductively whenever I was near a display of Kureyon at one of PDX's many LYS's. Ultimately, I found several colorways that were rich, subdued, enticing, and maddeningly desirable. You know how it goes: you see yarn and you must. have. it. You can't stop thinking about it until you take it home or find that project that will show it off most wonderfully--or both. And so it was with me and this scarf. Truly, I found four or five colorways that spoke to me, but these two (Noro Kureyon 185 [purples, greens, oranges, yellows] and 195 [blues, greys, olive, ochre, black]) really complimented each-other well.


I was really charmed by each colorway for similar reasons: the colors individually were amazing and together they were breathtaking. I was excited to see how they'd play together, and play they did!!! I knit this during the Snowpocalypse of 2008 and the color changes and combinations really kept me from going mad when PDX was, effectively, shut down by more than a foot of snow. It was amazing to see the rich cobalt blue of the darker colorway knit up next to the ripe papaya of the more vibrant one, and then there were combinations like lilac vs. olive drab, purple iris vs. mahogany, saffron vs. navy, mandarin orange vs. candied date, and goldenrod vs. dryer lint--even the most unlikely 'color' hit its stride when partnered with the right hue! I now understand what Jared Flood (a.k.a. BrooklynTweed) meant when he said this project seems almost like cheating, but then I remember the sage advice of my friend Karin: "Sometimes a B+ effort is good enough!"


Again, pretty much everyone and their mom has knit this scarf, but here is how I made mine: I used a tubular cast-on to cast on 36 stitches, then slipped the first stitch of every row knitwise, *k1, p1* to the last stitch, purl the last stitch. The resulting slipped-stitch edge is lovely, hides the yarn that you carry up the side for easy color-changes, and doesn't have any of the problems of created a bowed scarf that I've heard others mention when they slip the first and last stitch of every other row. I knit like mad until I had used all four balls of yarn (and a couple of yards of green from Kureyon colorway 172 left over from another project), then finished it up with a tubular bind-off.


After a couple of gentle washes (to encourage softening of the yarn) and a good soak in Kookaburra wool wash (to encourage huffing of the yarn), this scarf is hands-down putting all my grey scarves out of business!

Thanks again to Lee and Sarah for lending the skills and space (respectively) that made this post happen.

Monday, January 5, 2009

It's like Christmas in...January.

Sometimes it's nice to be reminded of how fortunate one really is. It's both humbling and gratifying at the same time to receive a gift like what I found when I came home today. My friend Karin had told me to be on the lookout for something coming soon. A couple of months ago she grilled me on yarn. How can you tell if it's good quality? How much is enough to make something small? Bigger than a hat, but smaller than a sweater. What's a reasonable price? It can be hard to explain these things to a novitiate of the Yarney Arts, moreso when the interviewer is a yarn muggle on a different continent! I was not at all ready to for the size of the box I found on my porch, nor was I expecting to open it to find this:


For scale: the box is approx. 10"x10"x14". That's a LOTTA yarn!!! It seems to be sport/fingering weight and I'm estimating each of the larger balls has no fewer than eleventy-pi yards. Karin included a note in the box that explained I had just received four balls of merino wool from the Milanese Farmer's Market and a skein of handspun yarn from alpacas that live in the Swiss Alps (she touched them!). Navy, Slate Blue, Chocolate, and Papaya! I'm reeling with project ideas and potential color combinations. Shawls? Lightweight sweaters? Scarves? Gloves? Oy! Thankfully I have plenty to keep me busy in the way of other projects while these ideas simmer.

But wait--there's more!!! Karin also included miscellaneous artsy craftsy finds:


A cute little heart magnet with what could be a name-tag, an order, or a statement:


Some gastronomical treats from Italy: Karin's favorite ring crackers, an Italian version of a smore's candy bar, and some Italian Espresso coffee.


I like this little guy. I'm not sure yet where he'll land, but I have a few ideas (and coordinating thread).


This sticker is the sum of the parts, really. It says so much while saying very, very little. :o)


In all, the few pictures in this post are really a testament to how excited I was to receive this care package-cum-gift. The light in my room is crap, and I didn't want to wait for another sunny day in PDX. Though I keep telling myself to build a lighting box in which to photograph stuff, I have yet to do it. Also, I have nothing that I'd say constitutes a suitable background. I was determined to make this post tonight, though, and I had a good time working with what I had available to set up the shots you see here.

Ciao!

Saturday, January 3, 2009

Knitting Gets Harcore.

Way back in August 2008 I started a Lace Ribbon Scarf designed by Veronik Avery. (Here's a link to my Ravely Project Page, for those Rav Members amongst us, though most of the project info is in this blog post.) I was using some effing DELICIOUS yarn--Dream In Color Smooshy in the Cocoa Kiss colorway. I was also delighted to use Brittany needles in size US3. Not only are these needles sustainably harvested and packaged in the most environmentally-friendly way possible, they're just plain pretty.

When I started this pattern I was committed to using only one skein of yarn. I originally cast-on 44 stitches for a scarf with four "ribbons" (the pattern calls for 53 sts to create a scarf w/five "ribbons"). While knitting, I noticed that the yarn tended to stain the lovely birch needles.


It was more of an observation than anything, I mean, knit happens, right? =oP The picture above shows a stained needle next to a brand-new one, to illustrate the extent of the color transfer from the yarn. This was after knitting about 4' of scarf, at which point I realised that the remaining yarn from this skein would only allow a scarf of approximately 5.5' in length. I really wanted a longer, narrower scarf, though, so I frogged the entire creation and started over, this time casting on 35 sts for a scarf with 3 "ribbons".

Sometime during the knitting of the newer, narrower scarf, one of my pretty Brittany needles snapped. :o(


Now, this pic shows a needle that is snapped in two places, and I'll tell you about the 2nd snap in just a moment. The first break happened near the end with the lovely finial, and was actually the result of the needle snagging on a friend's couch as I picked up my knitting bag. A broken needle didn't stop me, though; I called the good folks at Brittany and told of my mishap and they sent a replacement needle post-haste, tout-de-suite, and free gratis [sic].

(As a quasi-aside: the pic above also shows a brass safety pin in my knitting. I used this to keep track of which row I was on in the lace ribbon pattern. As the pattern repeats over 23 sts, I'd place the safety pin in the stitches on the first row and count from there when I needed to check my progress in the pattern.)

In the meantime, I wrapped a rubber band around the broken end in order to stop my work from sliding off the broken end, and I kept on knitting! This was my first lace work and the pattern was so easy to memorize, quick to knit, and yeilded such lovely results, that it was all I worked on from the time I cast on those original 44 stitches.

Unfortunately, while waiting for the replacement needle that Brittany had been so good to send, I sat on my knitting (there may or may not have been beer involved on the night in question. My Log may or may not have seen something that night)! Ergo, two breaks in one needle. Fortunately, however, the replacement arrived the very next day, so I was able to transfer my work to it and keep on knitting.


The scarf is now finished and has been for quite some time. Its unblocked measurements are approx. 5.5"x82". It needs to be blocked to square it out, though, and I've had a hard time locating a spot in this house with wood flooring which would be suitable for pinning down such a scarf. Also, Dream in Color has a tendency to bloom a fair bit, so I expect it to gain some size once it's been washed and soaked (mmmmmm, kookaburra!!!).

More photos of this to come, but in the meantime, I think this last photo give a fair representation of the pattern and general look of the scarf.

Who Are These Guys? What is This? What's Going On Here?

You're here and you're curious and you want to know why this blog is here and why you should care. I get it, I do; it's the same thing I wonder in situations like these. Two boys in love with yarn created this blog to chronicle our joys and triumphs (hopefully) and also our madnesses (hopefully not so much) when it comes to things yarney and knitterly.

These Boys In Love With Yarn are David (aka Davitron) and Homero (aka TricotChico [rhymes w/'Romero' but the H is silent--ed.]), who each started knitting for similar reasons, though indipendently of each-other. In both cases, the soon-to-be knitter wanted a scarf that couldn’t be found at a retail shop, so we each took up needles and sallied forth into the world of yarn, knitting sticks, knits, and purls.

Once these projects were complete (or nearly so), we each started to think of other garments and accessories that we wanted and launched our own pattern searches. Though our tastes and goals differed slightly, the crux was the same: neither of us could find readily-available hand-knitting patterns for menswear and accessories that were quite what we wanted. We’d find a pattern and make mental notes of changes we’d make, which generally resulted in a whole new creation. So, here we are: we’ve designed much of what we’ve knit and find that the next reasonable step is to share these designs with others who have shown interest. With our powers combined, we are Splendor (<= Ravelry link).

Our tastes and aesthetics differ from each-other's slightly, but mostly exist at the intersection of punk/hip/electro/and classic. In making patterns for hand-knitting, though our ultimate goal is the same: to make stuff we(/he)’ll actually wear.

The process of getting going has proved a little longer than we originally expected, but stay tuned! We’re not going anywhere, and patterns are coming soon!