
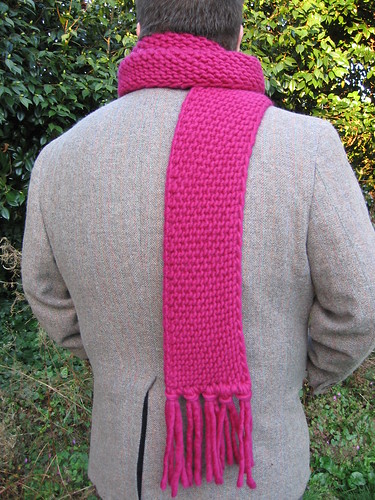
A different angle on a traditional garter-stitch scarf, I knit this both as a means to rectify a gap in my Knitter's Education and to create something eye-catching and fun-to-knit with this big, bold yarn. I'd never really made the de rigeur beginner's garter-stitch scarf and wanted to play with that stitch patter, but I also didn't want to make a plain, rectangular scarf with horizontal garter stitch, so I thought I'd try knitting on the bias. Not long after that, a pile of Brown Sheep Burley Spun caught my eye and insisted that I play with it. It comes in some really bold colors, and I LIT'rally couldn't stop thinking about it until I realised it was perfect for the garter stitch-on-the-bias scarf I so wanted to make. At the same time, Davitron (seen below modeling the scarf) needed a scarf, but hates knitting them, so really it was a win-win situation. ;o)

Knit in super-bulky yarn in a vibrant color, the big stitches and diagonal garter ridges are eye-catching and mask the super-easy backwards-loop cast-on used to increase. The slipped-stitch edge on the 'increase' side serves both to hide the increase stitch and mirrors the knit two together decrease used on the decrease side.
The full pattern text is published here, but the pattern is also available for download as a free PDF at the bottom of this post.
Size:The full pattern text is published here, but the pattern is also available for download as a free PDF at the bottom of this post.
The model shown measures approximately 6"x7'10", post-blocking.
Gauge:
Not super-important for scarves, but here it is: 8 sts & 12 rows = 4" in st st.
Materials:
- Brown Sheep Burley Spun, 2 skeins in fuchsia, OR approximately 260 yards of super-bulky yarn of your choosing in your favorite color.
- US 13 needles, or the size you need to obtain gauge.
Make it!
The construction of this scarf can, essentially, be broken down into three major parts: increasing, adding length, and decreasing.
Increasing:
-CO 3 sts
-Sl 1 knitwise, co1 using backwards-loop cast-on, k1, co1, k1
-next row: k4, p1
[next row: sl1, co1, k all sts to last st, co1, k1
-next row: k all sts to last st, p last st] repeat until you have 20 sts on your needle.
Adding Length:
Once you have 20 sts:
[1: sl1, m1, k all sts to last 2 sts, k2tog
2: p1, k all sts to last st, p last st]
-one edge of the scarf (the "m1" edge) will be longer than the other. Repeat these two rows until the "long side" measures the desired length, then...
Decreasing and Binding-Off:
Once you have reached the desired length for your scarf:
[3: k2tog, k all sts to last 2 sts, k2tog
4: p1, k all sts], repeat these two rows until you have 2 sts left.
-Slip the first stitch (the one closest to your hand on the "working needle") over the 2nd stitch. Cut a tail approximately 10" long, pull this through the last stitch and weave in ends.
Finishing:
Block and apply tassels as desired.
The pattern PDF is also available as a FREE download! Click the button below to download the PDF (you do not need to be a Ravelry member to download from this page).
 Happy knitting!
EDIT: Visit TricotChico.blogspot.com for more knitting patterns by Homero Luna.
 On Ravelry
 On Twitter


6 comments:
Ooh, this scarf looks surprisingly appealing! I really like how the edges look and the tassels at the ends really finishes it off. Great job! (I also like the idea of knitting a scarf in bulky yarn, it gets done so much sooner!)
This is lush and beautiful! Thanks for sharing the pattern!
Thanks for sharing, looks like a great go to pattern when I need a quick gift.
I am not a huge fan of the Garter Stitch, but this is really nice. I will be adding this to my list of knitting for Christmas.
Thanks for sharing!
strange...
i've never been turned on by a scarf before...
I just saw a north face scarf with a similar pattern but with a stockinette stitch instead of the garter stitch. I've been looking for a pattern like that and found this one, now we'll see if I can modify it with a stockinette stitch! Thanks!
Post a Comment